Homemade Gluten-Free Sweet Potato & Butternut Squash Gnocchi
Soft, pillowy homemade gnocchi made with roasted sweet potatoes, butternut squash, and a few simple ingredients.
There’s something so comforting about making homemade gnocchi, especially during the fall months when sweet potatoes and butternut squash are in season.
If you’ve never made gnocchi from scratch, this is such a lovely recipe to try! Instead of traditional potatoes, I use a combination of roasted sweet potato and butternut squash. Roasting brings out their natural sweetness and gives these little pillows of goodness a beautiful golden colour.
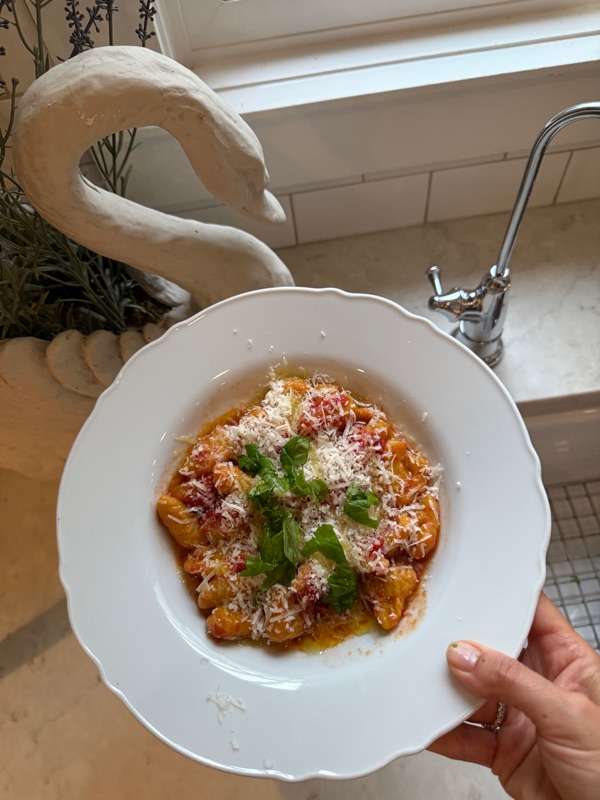
And the best part? They’re completely gluten-free!
I love making a batch ahead of time and keeping them in the freezer for those days when we’re craving a cozy, homemade meal.
Why You’ll Love This Recipe
- Naturally comforting: Sweet potatoes and butternut squash add a delicious, slightly sweet flavour.
- Gluten-free: Made with gluten-free all-purpose flour.
- Simple ingredients: Just a handful of everyday ingredients.
- Freezer-friendly: Perfect for preparing ahead of time.
- Fun to make: Rolling and shaping each piece is one of my favourite parts!
Ingredients
- 1 medium sweet potato
- 1 small butternut squash (approximately the size of your hand)
- 1 large egg
- 3 cups gluten-free all-purpose flour, plus additional flour as needed
- Approximately 1 extra cup gluten-free flour for dusting and shaping
- Olive oil, for roasting
- Salt, to taste
A little note about the flour: Depending on the size of your vegetables and how much moisture they contain, you may need to add a little more flour while mixing your dough. The goal is a soft dough that holds together without being overly sticky.
How to Make Gluten-Free Sweet Potato & Butternut Squash Gnocchi
Step 1: Roast the Vegetables
Preheat your oven to 400°F (200°C).
Wash your sweet potato and butternut squash thoroughly.
Line a baking sheet with parchment paper and drizzle with a little olive oil.
Cut the butternut squash in half and remove the seeds. Place the vegetables on the prepared baking sheet, drizzle lightly with olive oil, and sprinkle with salt.
Roast until the vegetables are completely tender and easily pierced with a fork, approximately 40–60 minutes, depending on their size.
Allow them to cool until they’re comfortable to handle.
Step 2: Remove the Skins
Once roasted, slice open the sweet potato and gently peel away the skin. It should come off very easily.
Remove the roasted butternut squash flesh from its skin.
Transfer the flesh of both vegetables to a large mixing bowl and mash until smooth. Allow the mixture to cool before adding the egg.
Step 3: Make the Gnocchi Dough
Add one egg to the cooled mashed vegetables and mix well.
Gradually add 3 cups of gluten-free all-purpose flour, mixing with a wooden spoon until a soft dough begins to form.
If the mixture is still too sticky, add additional flour a little at a time.
My tip: Don’t worry if you need a little extra flour! The moisture in sweet potatoes and squash can vary, so you’ll need to adjust until the dough is soft, manageable, and holds together.
Avoid adding too much flour at once, as this can make the gnocchi dense.
Step 4: Shape and Chill the Dough
Once your dough comes together, lightly flour your work surface and shape it into a ball.
Dust the dough with a little more flour, wrap it tightly in plastic wrap, and refrigerate for approximately 1 hour.
This helps firm up the dough and makes it easier to roll and shape.
Step 5: Roll and Cut the Gnocchi
Remove the chilled dough from the refrigerator.
Lightly dust your work surface with gluten-free flour.
Divide the dough into smaller portions and roll each portion into a long rope, approximately ¾ inch thick.
Using a knife or bench scraper, cut the ropes into small, bite-sized pieces.
If you’d like those beautiful traditional gnocchi ridges, gently roll each piece over a wooden gnocchi board.
This step is optional, but I absolutely love the way they look!
Step 6: Prepare for Freezing
Lightly dust a baking sheet with gluten-free flour.
Using a bench scraper, gently transfer your shaped gnocchi onto the baking sheet, arranging them in a single layer so they don’t stick together.
Place the baking sheet into the freezer until the gnocchi are firm, approximately 1–2 hours.
Once frozen, transfer them to a freezer-safe container or bag.
For best quality, use within approximately 2–3 months.
How to Cook Your Homemade Gnocchi
Bring a large pot of salted water to a gentle boil.
Add your gnocchi in small batches, making sure not to overcrowd the pot.
Cook until the gnocchi float to the surface, then allow them to cook for another 1–2 minutes, checking that they’re cooked through.
Remove gently with a slotted spoon.
If cooking from frozen, there’s no need to thaw them first!
For an extra delicious finish, toss the cooked gnocchi in a skillet with a little butter or olive oil until lightly golden.
My Favourite Ways to Serve Them
These sweet potato and butternut squash gnocchi have such a lovely flavour that they don’t need much dressing up!
A few delicious serving ideas:
- Brown butter and sage: A classic fall combination.
- Garlic butter: Simple, comforting, and delicious.
- Creamy Parmesan sauce: Perfect for a cozy dinner.
- Olive oil and fresh herbs: A lighter option that lets the vegetable flavours shine.
Tips for Perfect Gluten-Free Gnocchi
1. Roast instead of boil. Roasting helps concentrate the vegetables’ flavour without adding extra water.
2. Let your vegetables cool. Adding the egg to very hot vegetables can cause it to cook prematurely.
3. Add flour gradually. Start with 3 cups and adjust as needed. The dough should be soft but workable.
4. Don’t skip chilling. Refrigerating the dough makes shaping much easier.
5. Keep your work surface floured. Gluten-free dough can be a little sticky, so keep extra flour nearby.
6. Test one gnocchi first. Cook a single piece before boiling a full batch. If it falls apart, the remaining dough may need a little more flour or binding.
Frequently Asked Questions
Can I make these gnocchi ahead of time?
Absolutely! I actually love preparing them ahead and freezing them so they’re ready whenever we want a homemade meal.
Do I need a gnocchi board?
Not at all! You can leave your gnocchi as little pillows or gently press them with the back of a fork to create ridges.
Can I cook them straight from frozen?
Yes! Add the frozen gnocchi directly to gently boiling salted water. No thawing required.
Why is my gnocchi dough sticky?
Sweet potatoes and butternut squash naturally contain moisture, and the amount can vary. Simply add a little extra gluten-free flour until your dough becomes manageable.
Can I use any gluten-free flour?
A gluten-free all-purpose flour blend designed for baking is a good starting point. Different blends absorb moisture differently, and those without a binder such as xanthan gum may produce a more delicate dough.
A Little Note From My Kitchen
One of my favourite things about cooking from scratch is slowing down and enjoying the process.
From roasting the vegetables to rolling out the dough and making those little gnocchi ridges, there’s something so satisfying about creating a homemade meal with simple ingredients.
I hope you enjoy making these as much as I do!
If you try my Gluten-Free Sweet Potato & Butternut Squash Gnocchi, I’d love to hear how they turn out!
Don’t forget to save this recipe for later and follow along on Instagram @blushingpinkpetals for more homemade recipes, cozy cooking inspiration, and kitchen favourites.
With love,
AnnaMaria 🤍
0 comments